SharePoint Integration In Dynamics 365 Business Central
Do you know that Business Central SharePoint integration can help you simplify your current document management process without any further investment? If not, this blog will give you the exact knowledge you have been missing since you became a Business Central user.
Dynamics 365 Business Central is a business-centric ERP solution that understands the business’s needs and provides solutions accordingly. It offers seamless personalisation and various integrations, including Business Central SharePoint integration, to increase the productivity of users with enhanced overall efficiency.
Almost all businesses need a solution capable of understanding their business and its unique needs, and Business Central is one such solution. It is also popular for its ease of accessibility and simple yet powerful user interface. Such features not only align the business with its current needs but also prepare it for future requirements. Before getting into the depths of integrations, let’s understand the basics of SharePoint and D365 Business Central.
What is Microsoft SharePoint?
Microsoft SharePoint is a powerful document management and sharing platform to manage business documents seamlessly. It empowers employees toward teamwork and hassle-free collaboration while enhancing overall productivity. With the ability to manage entire content, it provides an interactive user interface with powerful data security features.
SharePoint is a web-based platform capable of sharing documents, archives, reports, resources, news, digital data, and much more. The best part about this platform is – it can be operated on any device, whether PC, MAC, or mobile, using any web browser. Microsoft SharePoint consolidates all data and makes it available to users via an intranet, extranet, or the internet.
What is Dynamics 365 Business Central?
Microsoft Dynamics 365 Business Central is an all-in-one business management solution built specifically for SMBs. Previously known as NAV (Navision), it provides SMBs with simple yet powerful business management features that no one else in the market does, regardless of industry.
Being a cloud-based application, it can streamline almost all departments of a business, including finance, sales, operations, inventory, customer support, and manufacturing, with a single interactive dashboard.
Business Central not only manages the entire business but also provides opportunities to improve customer relations while paving the way for easy growth. D365 Business Central runs on the latest technologies, including AI, BI, and ML, to provide automation, resulting in increased overall efficiency while eliminating the chance of errors occurring during operations.
What is the need of Business Central SharePoint integration?
Business Central deals with various processes and operations to make things work. During such processes, data is the real factor that plays a vital role in the successful completion of the process.
Without integration, you need to manually feed the data onto Business Central servers. If you are a consistent user of SharePoint and Business Central, then you might need to duplicate the data available on SharePoint to use it in Business Central. This would make the whole process cumbersome as you would have to do it manually and on a recurring basis.
With Business Central SharePoint integration, you can export or feed the data to D365 Business Central using automation or in just a few clicks. If you want to save a lot of time, effort, and resources, go for this integration.
The process of integration is simple and can be completed using APIs, code, and third-party connectors. In this blog, we are going to learn the exact step-by-step process to integrate SharePoint with Business Central using an API key.
Process of Dynamics 365 Business Central SharePoint Integration
In this case, we are going to use SharePoint Connecter to connect both of these applications. Once we complete the integration, you will get real-time data in Business Central without any effort. After integration, you will be able to do the following tasks:
- Duplicate data automatically.
- Shares file in real-time.
- Signing file online.
- Downloading and uploading data.
- Converting desired document from Word to PDF
During this integration, we are going to use Microsoft AppSource to establish a connection. The steps are discussed below:
Step 1:
- Login to Business Central and Azure Active Directory using your credentials.
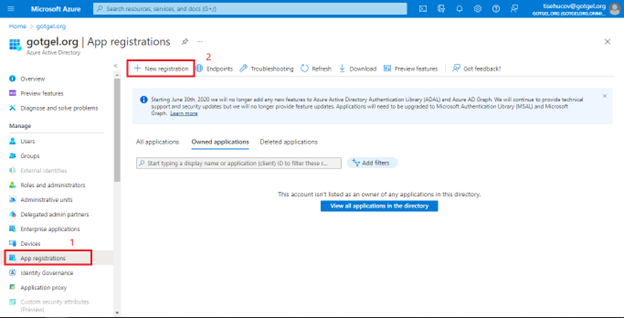
- Now, open the Azure Active Directory dashboard using the respected link and click on the App registrations option available on left under Manage menu.
- Click on the “New Registration” button available (refer to Image 1), and a new screen will be displayed (refer to Image 2).
 Step 2:
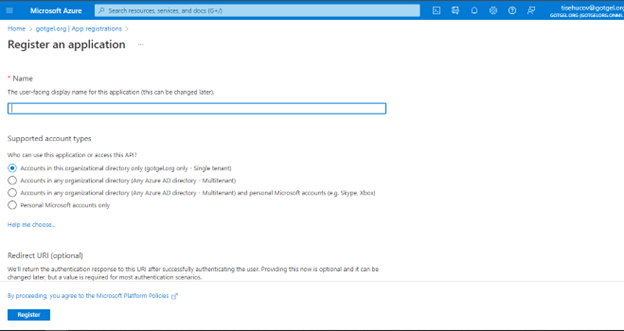
- Enter the name of the connection in the Name option and click on the Supported Account Types radio button as required.
- In the Redirect URL option, enter the details as shown in Image 3.

Copy the link from here.
- Once you provide the necessary details, click on Register button.
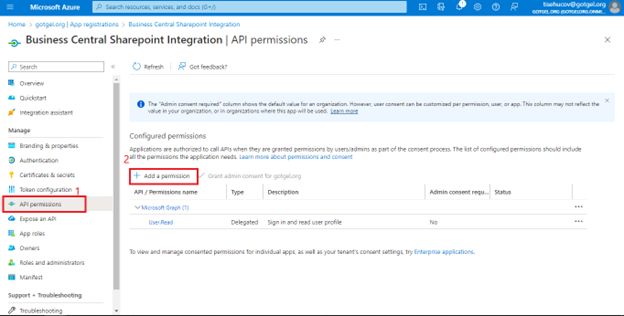
- You will get a notification in the upper right corner that shows Business Central application has been created, and you will get a similar screen (refers to Image 4).
 Step 3:
- From the current screen, click on the API permissions button to allow API connection.
- Now select Add a Permission button; refer to Image 5.
 Step 4:
- Once you click on this button, a new screen will pop-up with the name Request API Permissions. Here, you will see other integrations as well, but you have to click on SharePoint, refers to Image 6.
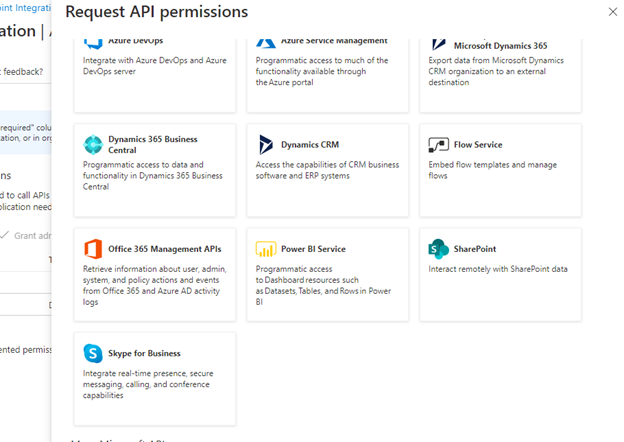
- Select the SharePoint button and it will show you a new screen where you have to click Delegated Permissions button.
- Now, select the options as shown in below image.
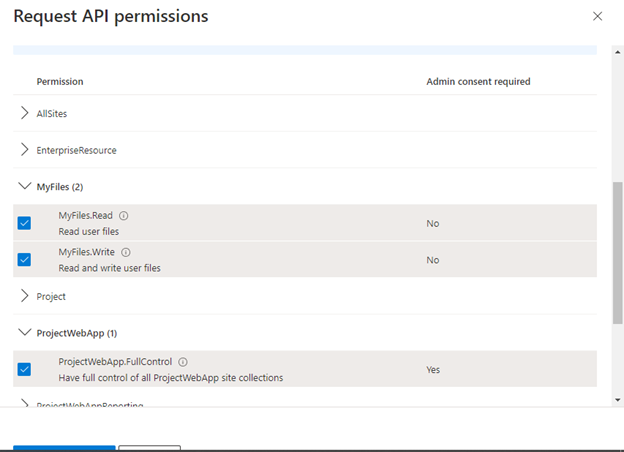
- Now click on the “Add Permissions” button and then “Grant Admin Permission” to grant all permissions.
- You will get a notification once Business Central adds permissions.
Step 5:
- Now, you have to add client secret. To do so, select Certificate and Secrets option available under Manage menu.
- Click on Add Client Secret button and specify the client’s name and expiry data; refer to Image 8.

- Now copy the Value of the secret code within minute of generating it and copy the Application (client) ID available in Overview tab.
- Till now, we have granted permissions for an unbreakable integration. Now, we have to align the Business Central to establish a two-way connection.
Step 6:
- Open the Business Central dashboard and click on Search button available on top of screen.
- Search for SharePoint in the search bar and click on Microsoft SharePoint Connection Setup from the search results.
- Specify the required details on Setup page, like client ID, Base URL, Client Secret, and more.
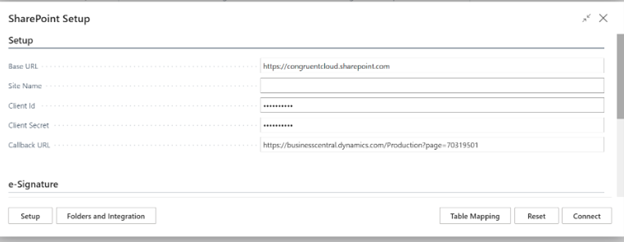
- Once you enter all details, click on the Connect button.
- Once connected, it will show a pop-up window with a message “Authentication finished.” This means your SharePoint has been connected with Dynamics 365 Business Central.
Step 7:
- To fetch data in real-time, you need to set up the Table Mapping feature.
- Now, you will see a window where you need to specify the data table to be mapped with SharePoint.
- If required, you can even upload the desired document using the Upload Document button to get the SharePoint data in real-time.
Conclusion
Business Central SharePoint integration can be done by other methods as well, but this blog showed you the simplest method. You can not only integrate SharePoint with your existing system but also try out other Microsoft Dynamics 365 integrations, like Office, Skype, Power BI, and more.
It might be possible that you are encountering an issue while following these simple steps. In such a case, you need to contact a certified Microsoft Gold Partner, like Dynamics Square, to resolve all your issues instantly. We will integrate the required native as well as third party applications with your existing system to enhance your efficiency and productivity without hampering any of your current processes.
To resolve your issue and accelerate your business’ growth toward high revenue, pick up your phone and contact : +44-207-193-2502 or email info@dynamicssquare.co.uk now.
See Also - Vend to Business Central Integration
.png)